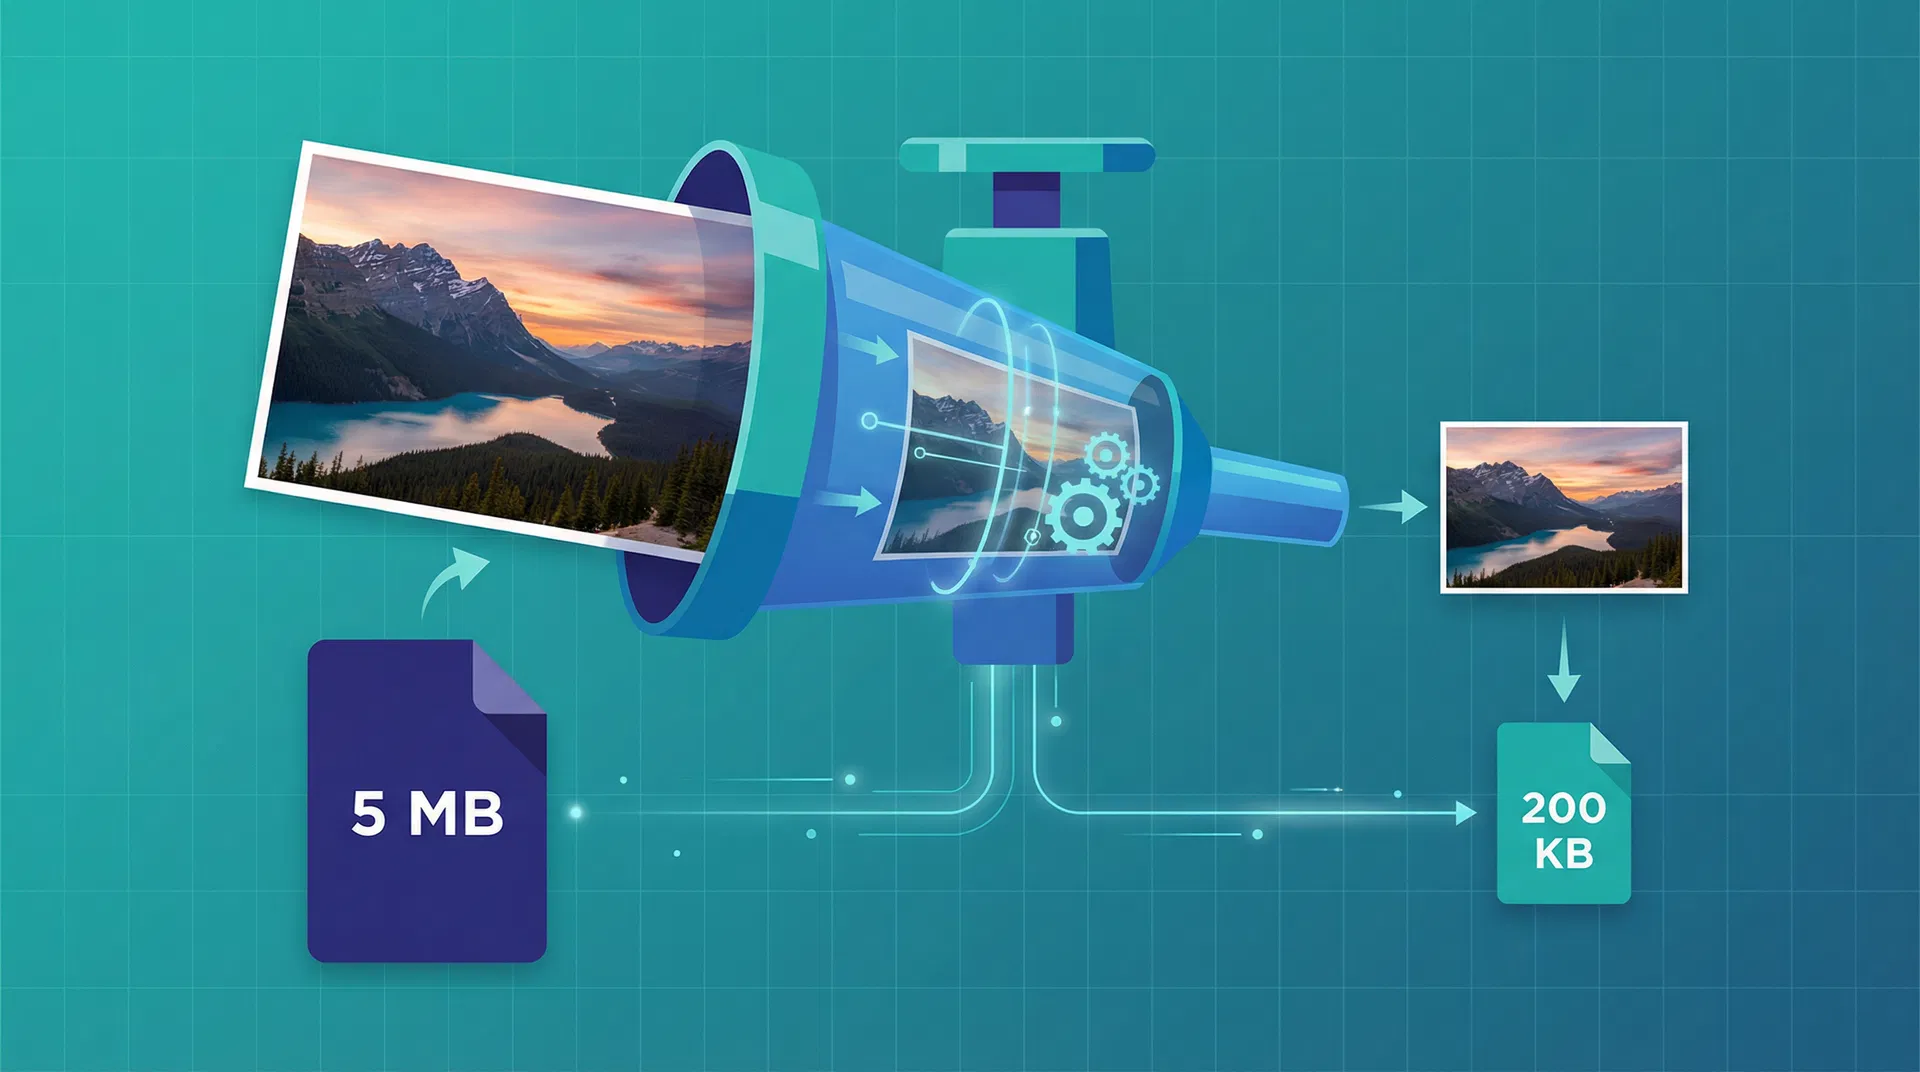
Large image files are the single biggest drag on website performance. They slow page loads, hurt your Google rankings, and frustrate visitors who abandon your site before it finishes rendering. The good news is that modern compression techniques can shrink image files by 60 to 90 percent while keeping them visually identical to the originals.
This guide covers everything you need to know about compressing images without losing quality - from understanding the science behind compression algorithms to choosing the right settings for every use case. Whether you manage an e-commerce store, run a blog, or build websites for clients, these techniques will make your images load faster without sacrificing the visual quality your audience expects.
Why Image Compression Matters More Than Ever
Images account for roughly half of the average webpage's total weight. According to the HTTP Archive, the median webpage now transfers over 2 MB of image data - and that number keeps climbing as screens get sharper and content gets richer.
This matters because Google uses Core Web Vitals as a ranking signal, and the Largest Contentful Paint (LCP) metric is directly tied to how fast your largest image loads. A good LCP score requires your page to render its main content within 2.5 seconds. Uncompressed images make that nearly impossible on slower connections.
The business impact is equally significant. Research consistently shows that every additional second of page load time reduces conversions by approximately 7 percent. For an e-commerce site generating $100,000 per month, shaving 2 seconds off load time by compressing images could translate to $14,000 in recovered revenue.
Beyond performance, compressed images reduce bandwidth costs, lower CDN bills, and make your site more accessible to users on mobile networks or in regions with slower internet infrastructure.
Lossy vs. Lossless Compression: Understanding the Two Approaches
Before you compress a single image, you need to understand the fundamental difference between the two compression methods. Each has distinct strengths, and choosing the wrong one for your use case can either waste bandwidth or destroy image quality.
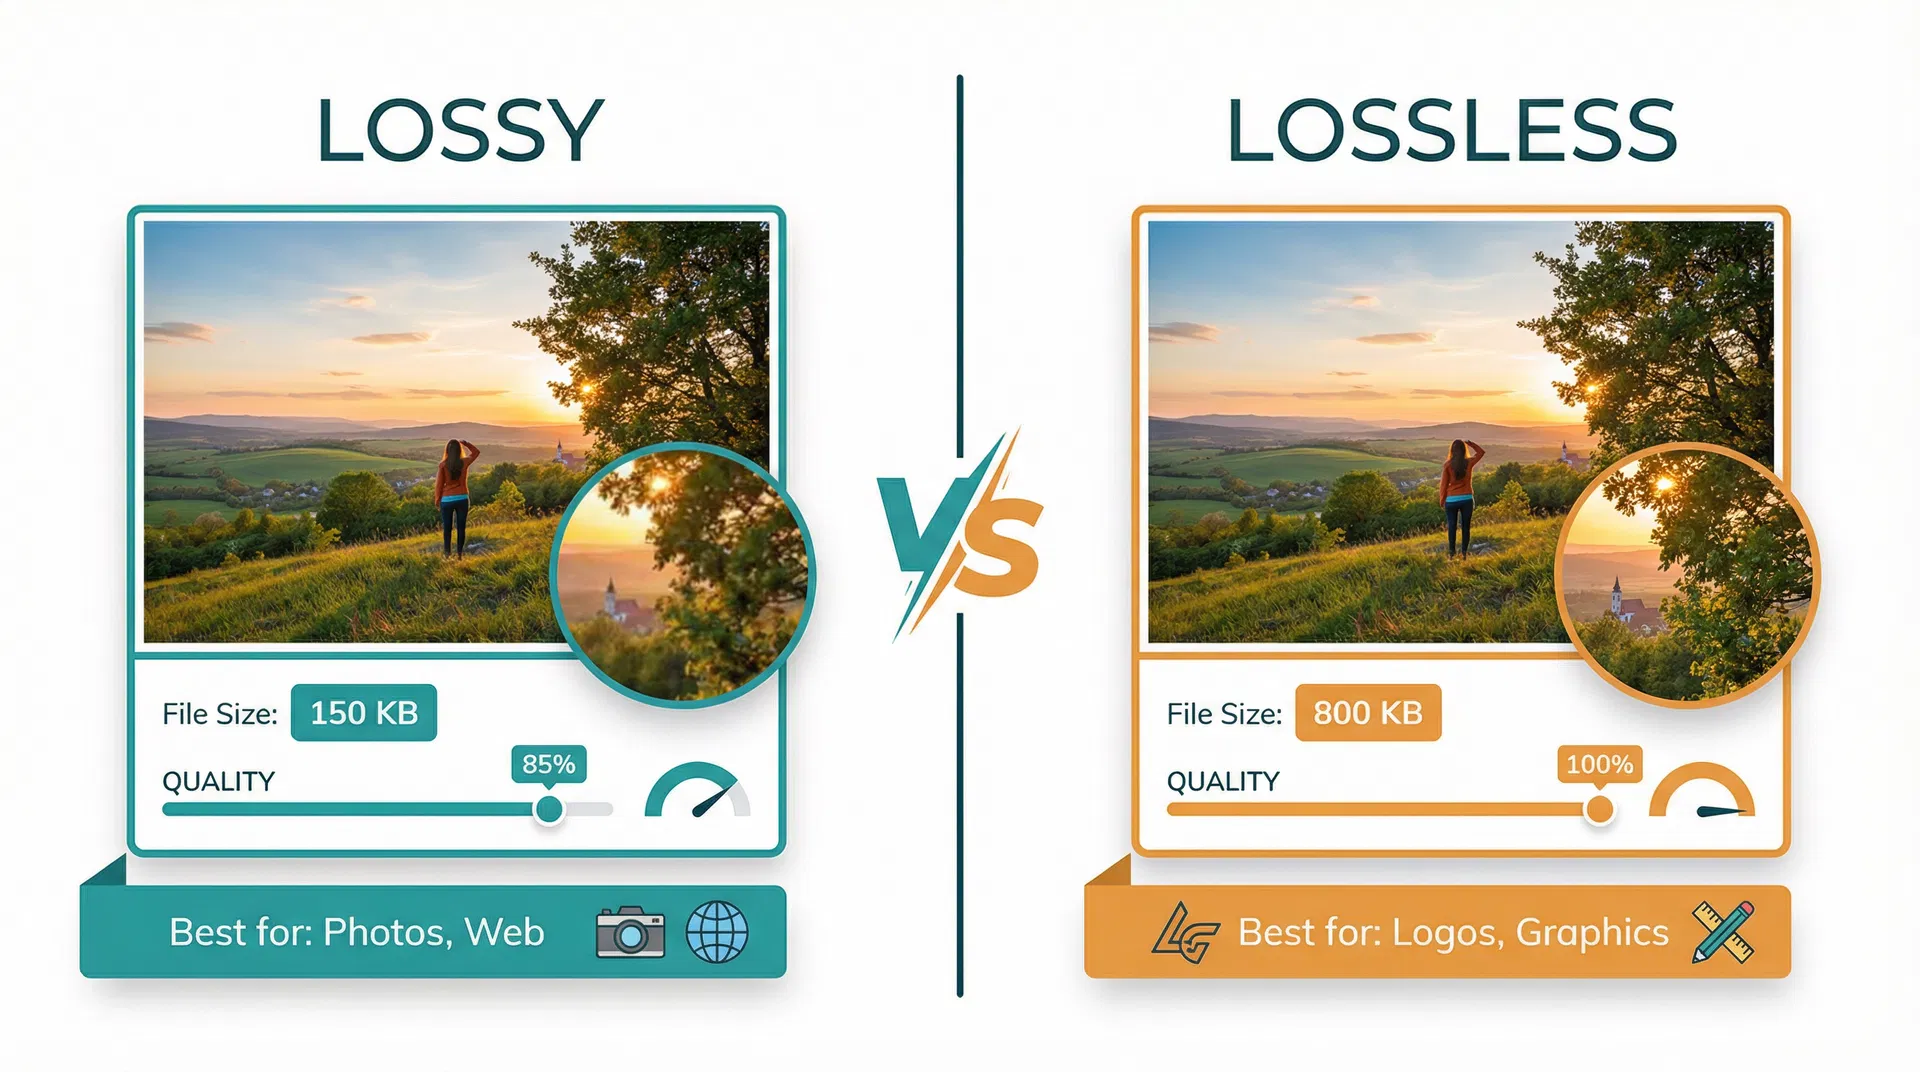
Lossy Compression
Lossy compression permanently removes some image data to achieve dramatic file size reductions. Modern lossy algorithms are remarkably sophisticated - they analyze which visual information the human eye is least likely to notice and discard that data first. At quality settings between 80 and 85 percent, the difference between the original and compressed image is virtually imperceptible, even when viewed side by side.
Lossy compression typically achieves 60 to 90 percent file size reduction, making it the go-to choice for photographs, product images, hero banners, and any image where some microscopic data loss is acceptable in exchange for significantly faster loading.
Lossless Compression
Lossless compression reduces file size without removing any image data whatsoever. The compressed file can be decompressed to produce a bit-for-bit identical copy of the original. This is achieved through more efficient data encoding - finding patterns and redundancies in the file and representing them more compactly.
The tradeoff is that lossless compression achieves more modest reductions, typically 20 to 40 percent. It is the right choice for logos, icons, screenshots, technical diagrams, and any image where pixel-perfect accuracy matters.
| Feature | Lossy Compression | Lossless Compression |
|---|---|---|
| File Size Reduction | 60–90% | 20–40% |
| Quality Impact | Imperceptible at 80–85% | Zero - bit-for-bit identical |
| Best For | Photos, banners, product images | Logos, icons, screenshots, diagrams |
| Formats | JPEG, WebP (lossy), AVIF (lossy) | PNG, WebP (lossless), AVIF (lossless) |
| Re-compression Safe? | No - quality degrades each time | Yes - no generational loss |
| Recommended Setting | 80–85% quality | Maximum compression level |
Important: Never re-compress an already lossy-compressed image. Each round of lossy compression removes additional data, and the quality degradation compounds. Always compress from the original source file.
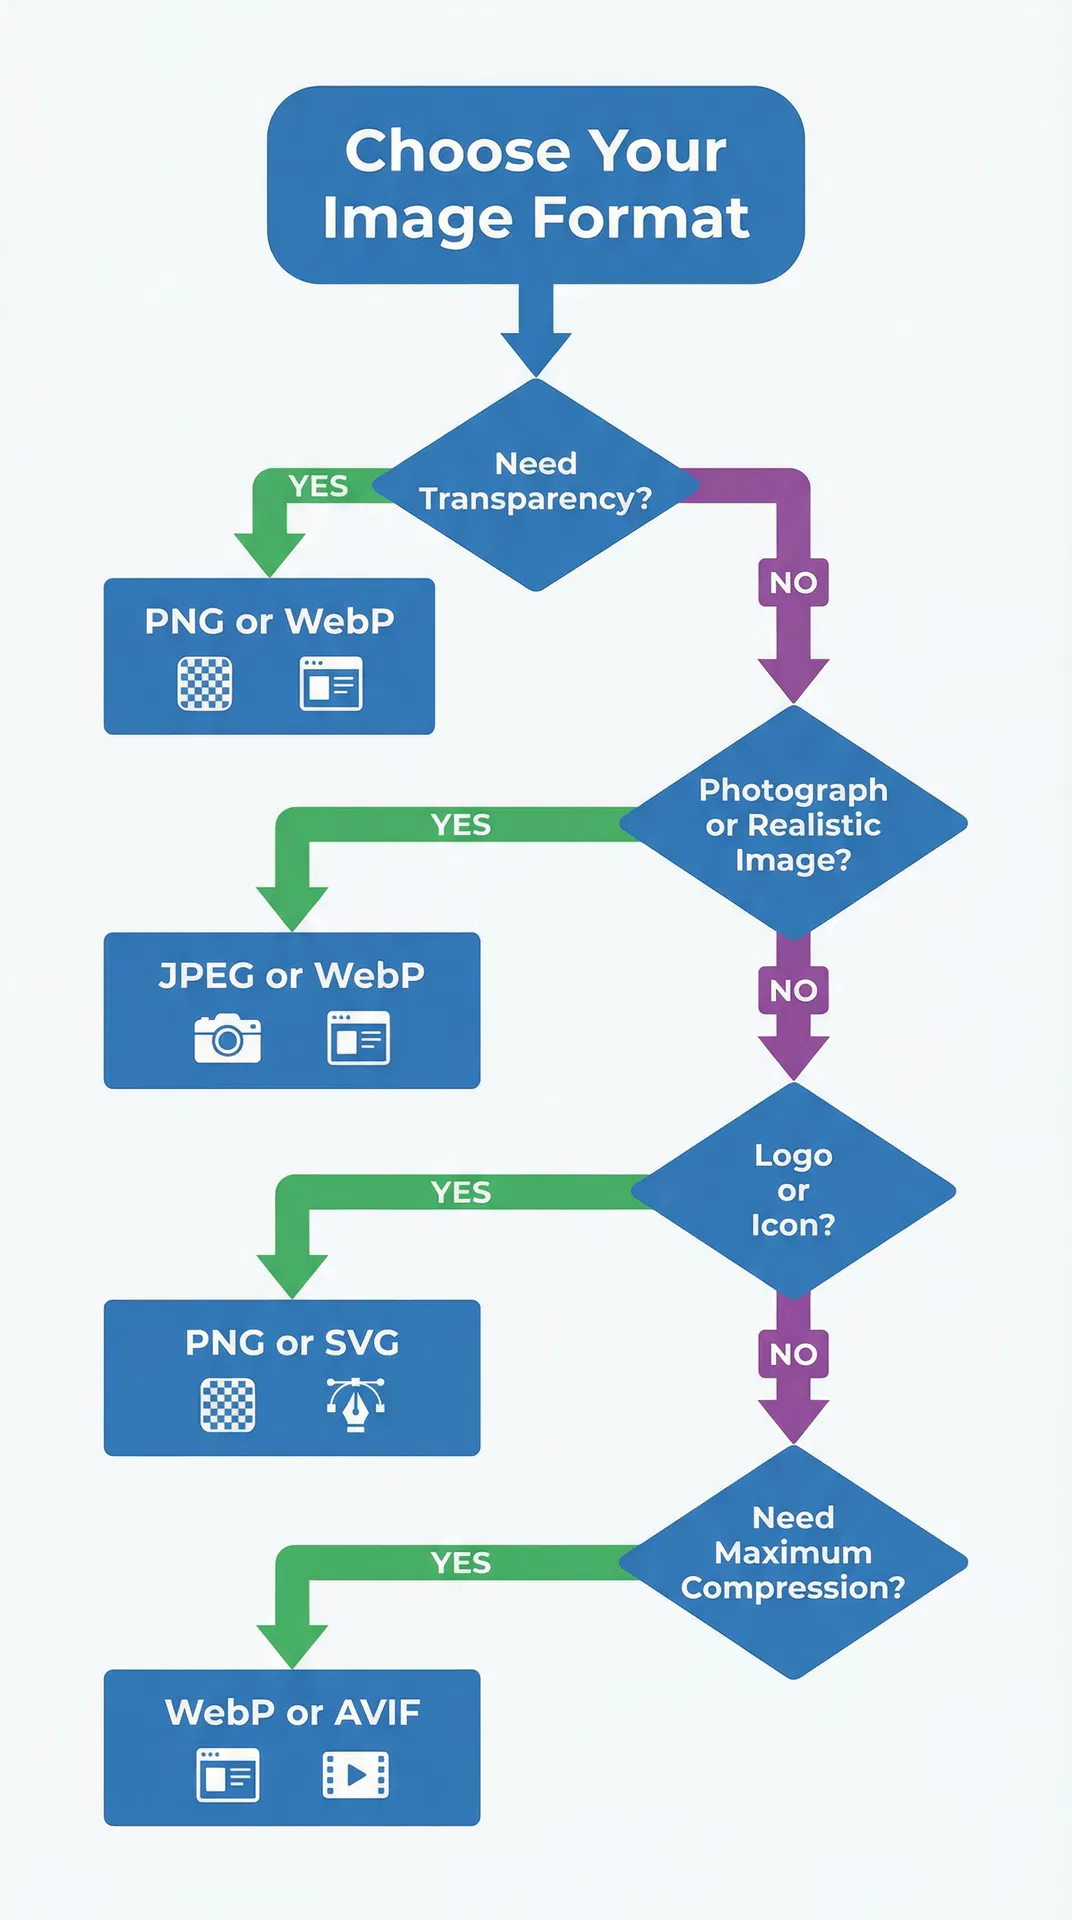
Choosing the Right Image Format for Maximum Compression
The format you choose has an enormous impact on file size - sometimes even more than the compression settings themselves. Modern formats like WebP and AVIF deliver dramatically better compression than legacy formats while maintaining equivalent visual quality.
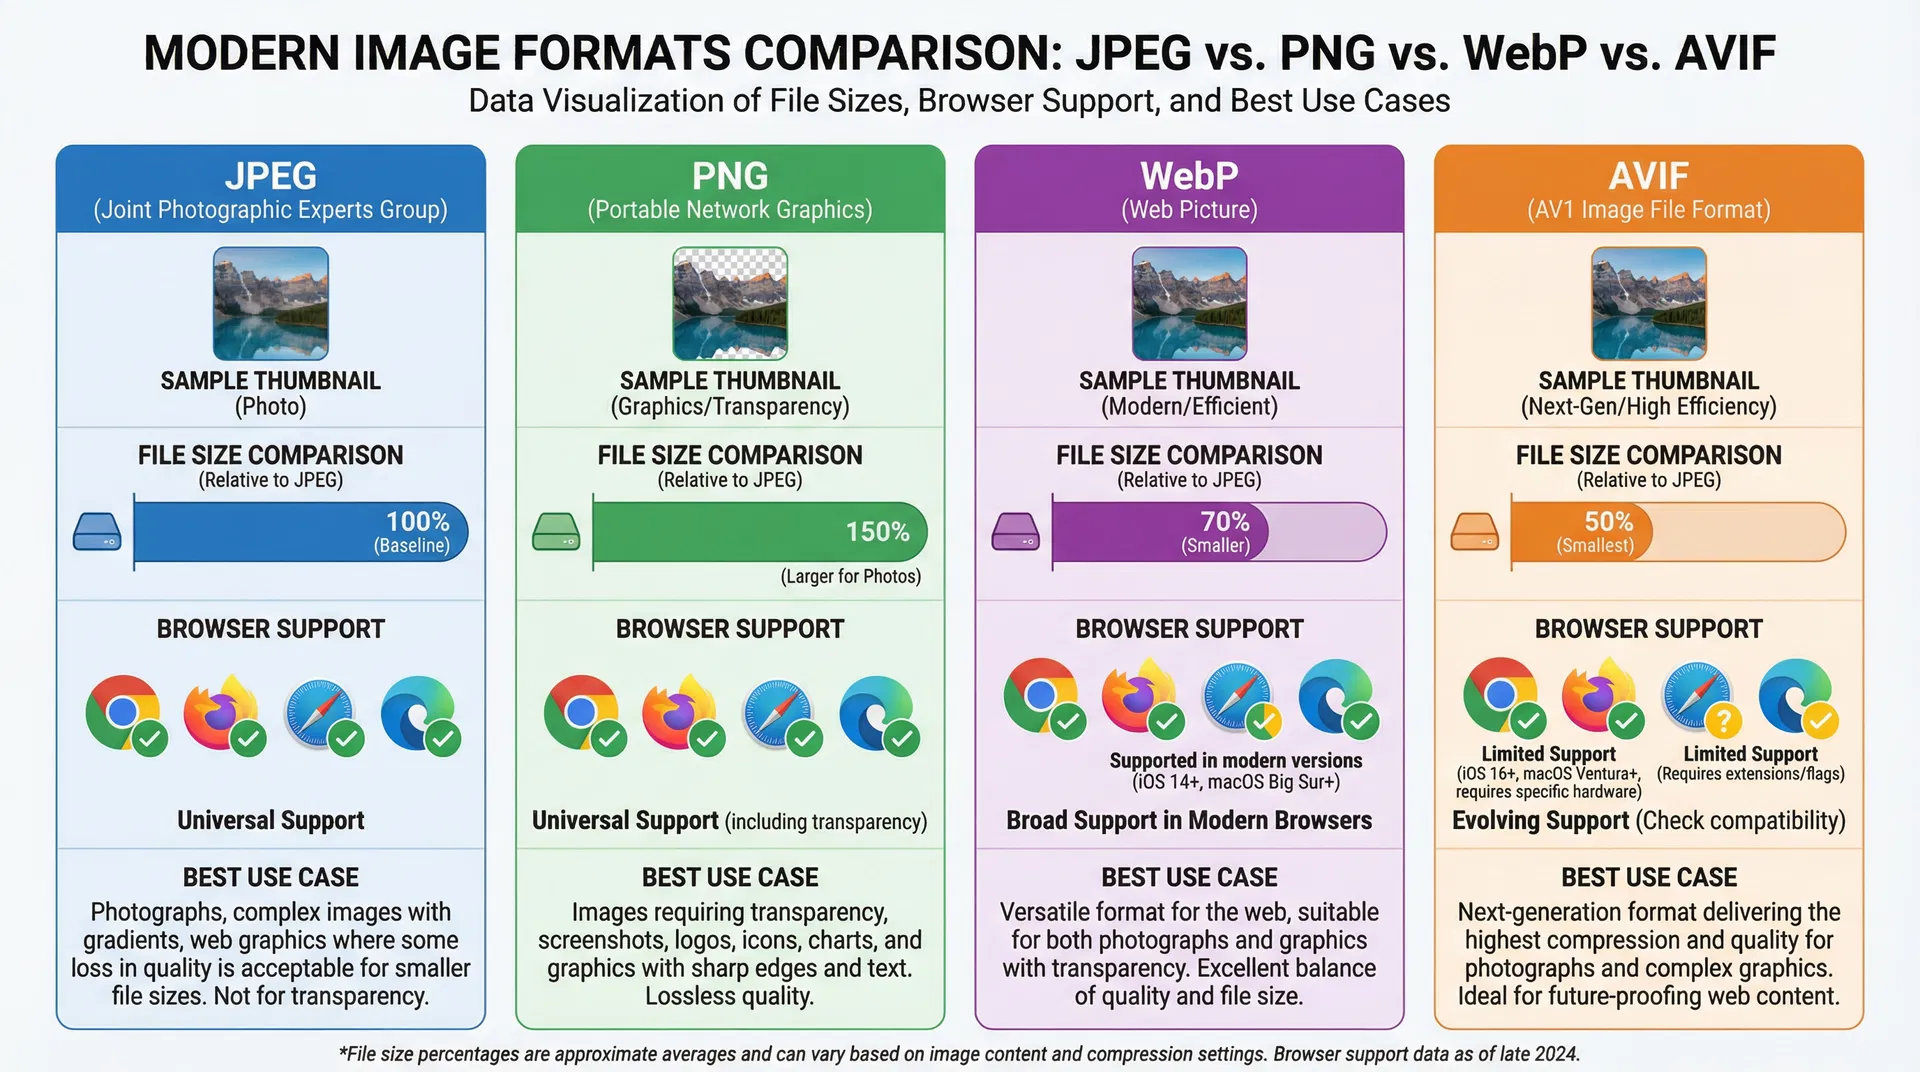
Format Comparison Table
| Format | Compression vs. JPEG | Transparency | Animation | Browser Support | Best Use Case |
|---|---|---|---|---|---|
| JPEG | Baseline (100%) | No | No | Universal | Photos where compatibility is critical |
| PNG | ~150% larger | Yes | No | Universal | Logos, icons, screenshots with text |
| WebP | 25–35% smaller | Yes | Yes | 97%+ browsers | General web images (best all-around) |
| AVIF | 50% smaller | Yes | Yes | 92%+ browsers | Maximum compression, future-proofing |
| SVG | N/A (vector) | Yes | Yes | Universal | Icons, logos, simple illustrations |
WebP is currently the best all-around format for web images. It supports both lossy and lossless compression, handles transparency, and is supported by over 97 percent of browsers in use today. Converting your JPEG images to WebP at equivalent quality settings will reduce file sizes by 25 to 35 percent with no visible difference.
AVIF pushes compression even further - approximately 50 percent smaller than JPEG at equivalent quality. Browser support has expanded rapidly and now covers over 92 percent of users. If your audience primarily uses modern browsers, AVIF delivers the best compression-to-quality ratio available today.
JPEG remains relevant when universal compatibility is essential, particularly for email newsletters, older CMS platforms, or audiences using legacy browsers.
PNG should be reserved for images that require transparency or contain sharp text and line art where lossy compression would create visible artifacts.
Five Methods to Compress Images Without Losing Quality
Method 1: Browser-Based Compression Tools (Fastest)
Browser-based tools process images entirely in your browser - your files never leave your device, which is ideal for sensitive or proprietary images. They require no software installation and work on any operating system.
How to compress with SwiftCompress:
- Open SwiftCompress in your browser
- Drag and drop your images onto the upload area (or click to browse)
- Adjust the quality slider - 85% is the sweet spot for most images
- Preview the compressed result alongside the original
- Download individually or batch-download all files as a ZIP
SwiftCompress processes everything locally using your browser's built-in APIs, so compression is instant and your images remain private. It supports JPEG, PNG, and WebP, handles batch processing, and shows you exactly how much space you saved for each file.
Method 2: Convert to a Modern Format
Sometimes the most effective compression technique is simply switching formats. Converting a JPEG photograph to WebP at the same visual quality typically reduces file size by 25 to 35 percent - and converting to AVIF can cut it in half.
Use the SwiftCompress Image Converter to convert between formats instantly in your browser. Upload your JPEG, select WebP or AVIF as the output format, and download the compressed result.
This approach is especially powerful for e-commerce sites with hundreds or thousands of product images. A batch conversion from JPEG to WebP can reduce your total image bandwidth by a third without touching a single quality setting.
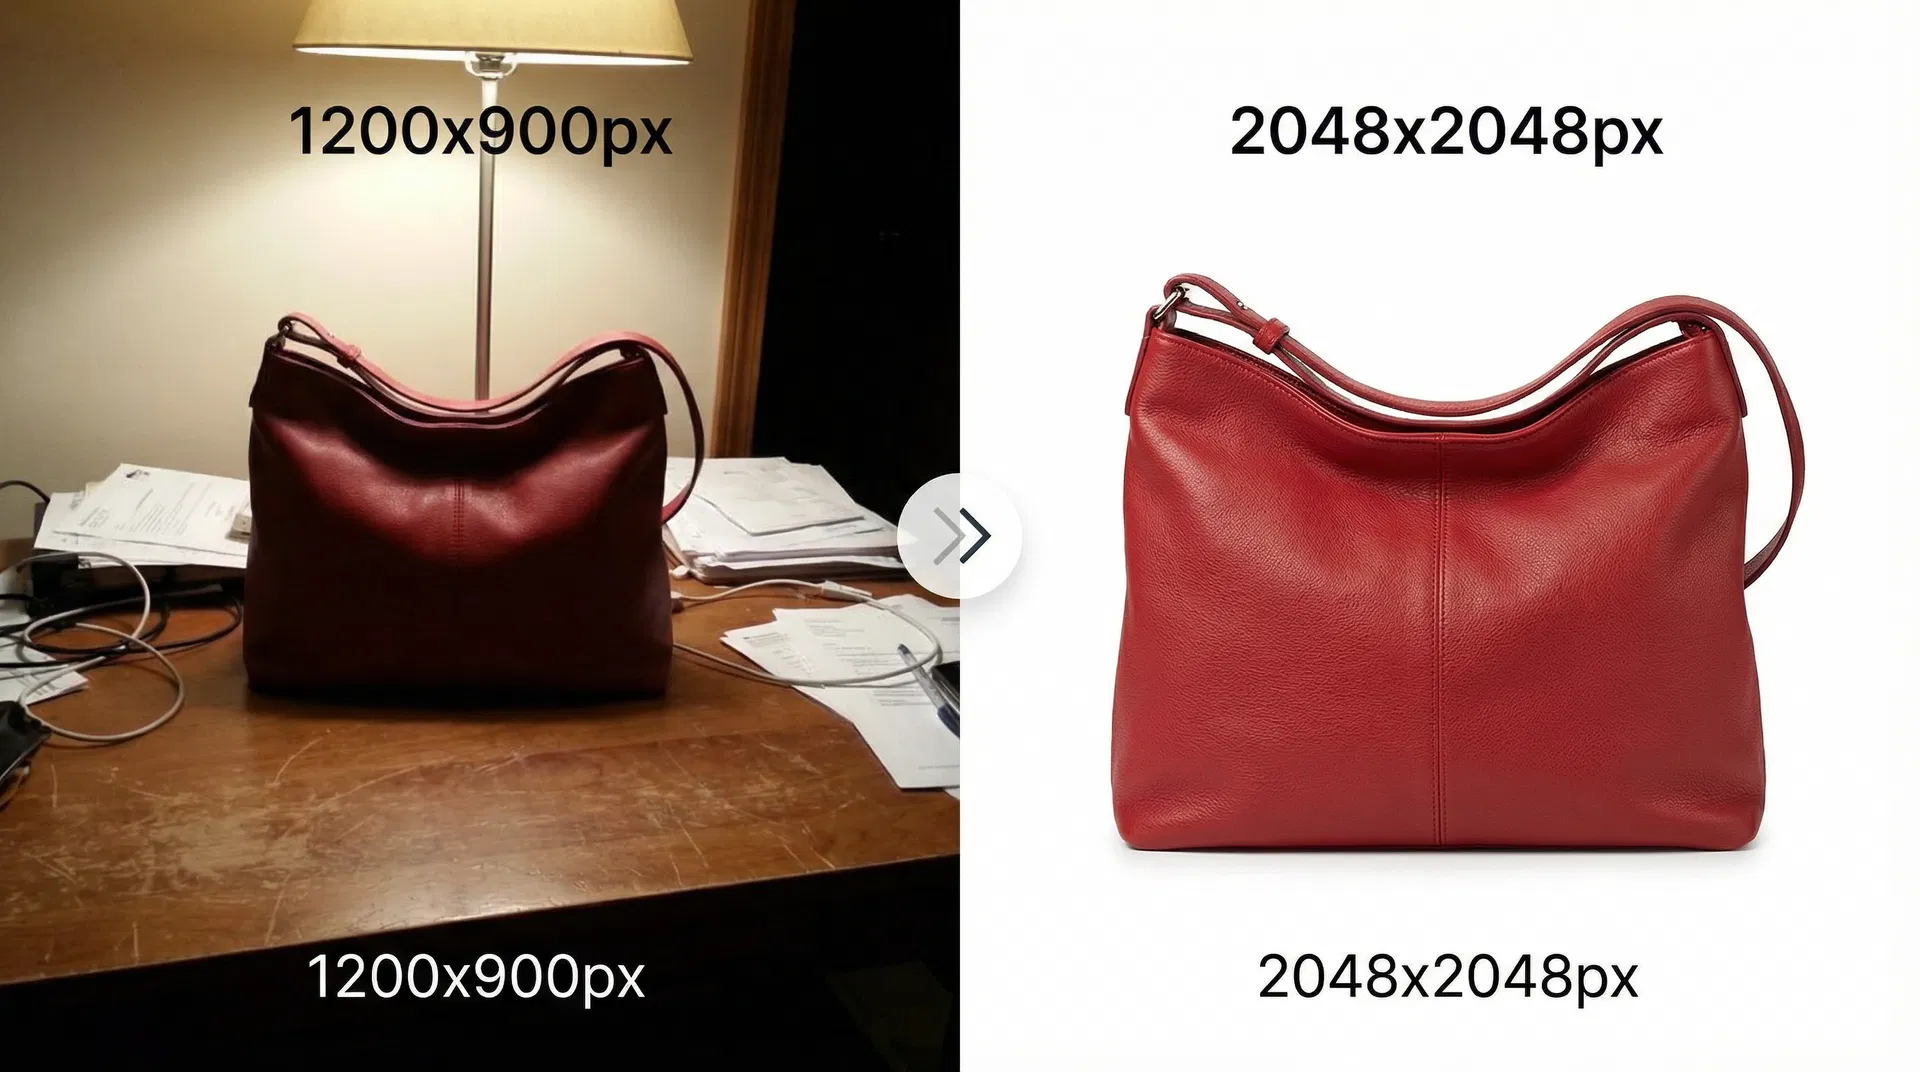
Method 3: Resize Before Compressing
One of the most overlooked compression techniques is simply resizing images to match their display dimensions. If your website displays product images at 800 by 600 pixels, uploading a 4000 by 3000 pixel original wastes enormous bandwidth on pixels that will never be seen.
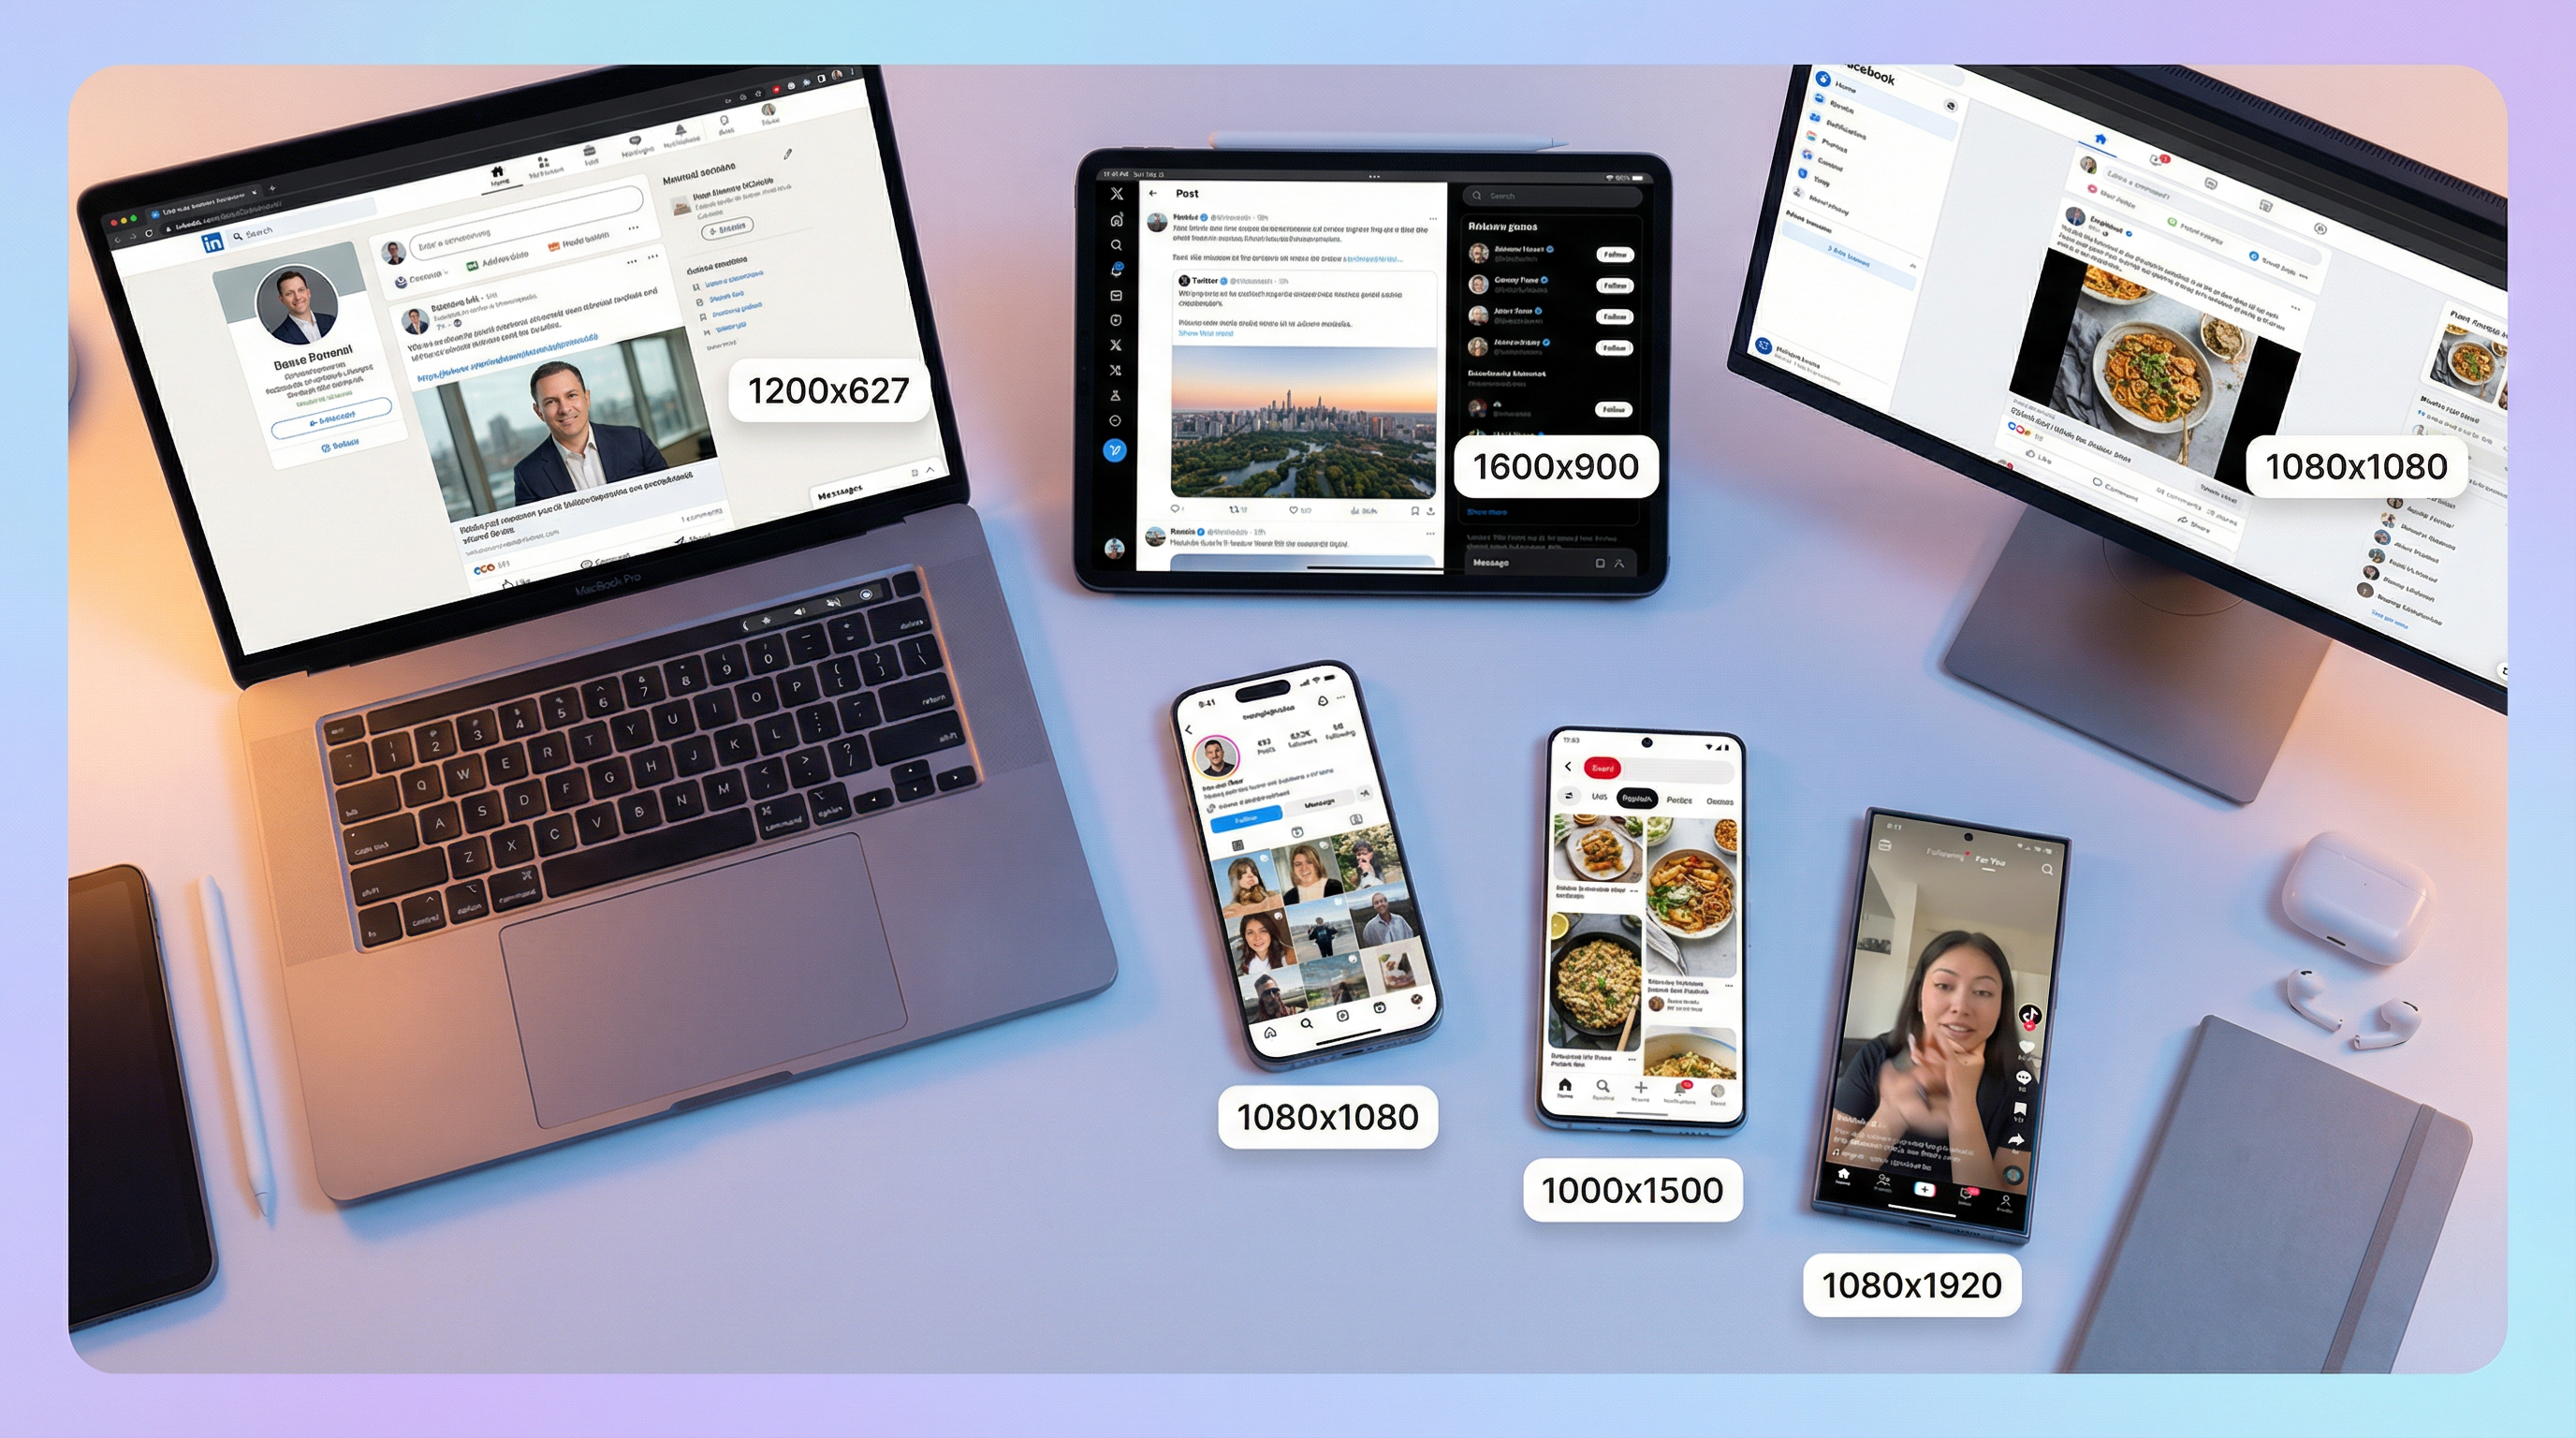
Recommended maximum dimensions by use case:
| Use Case | Max Width | Max Height | Typical File Size |
|---|---|---|---|
| Hero/banner images | 1920 px | 1080 px | 150–300 KB |
| Blog content images | 1200 px | 800 px | 80–150 KB |
| Product thumbnails | 600 px | 600 px | 30–60 KB |
| Social media sharing | 1200 px | 630 px | 80–120 KB |
| Email newsletter | 600 px | 400 px | 40–80 KB |
Resize first, then compress. This two-step approach often achieves 90 percent or greater file size reduction while maintaining perfect visual quality at the display size.
Method 4: Strip Metadata
Every photograph from a digital camera or smartphone contains embedded metadata - EXIF data including camera settings, GPS coordinates, timestamps, and sometimes thumbnail previews. This metadata can add 10 to 50 KB per image, and it serves no purpose on a website.
Stripping metadata is a form of lossless compression - the visible image data is completely unchanged, but the file gets smaller. Use the SwiftCompress Metadata Remover to strip EXIF data from your images before uploading them to your website.
Beyond the file size benefit, removing metadata also protects privacy by eliminating GPS coordinates and device information that you may not want publicly accessible.
Method 5: Use Responsive Images with the Picture Element
For web developers, the HTML <picture> element lets you serve different image formats and sizes based on the visitor's browser and screen size. This ensures every user receives the smallest possible file that still looks sharp on their device.
<picture>
  <source srcset="product.avif" type="image/avif">
  <source srcset="product.webp" type="image/webp">
  <img src="product.jpg" alt="Product photograph"
       width="800" height="600" loading="lazy">
</picture>
This approach serves AVIF to browsers that support it (50 percent smaller), falls back to WebP for older browsers (30 percent smaller), and uses JPEG as the universal fallback. Combined with the loading="lazy" attribute for below-the-fold images, this technique delivers optimal performance for every visitor.
Optimal Quality Settings by Use Case
The "right" compression quality depends entirely on what the image is for. Here are the settings that deliver the best balance between file size and visual quality for each common scenario.
| Use Case | Format | Quality Setting | Target File Size | Notes |
|---|---|---|---|---|
| Website hero images | WebP | 85% | 150–250 KB | Highest visibility - prioritize quality |
| Blog post images | WebP | 80% | 80–150 KB | Good balance for content images |
| Product photos (e-commerce) | WebP | 85% | 100–200 KB | Quality matters for purchase decisions |
| Thumbnails & cards | WebP | 75% | 20–50 KB | Small display size hides compression |
| Social media uploads | JPEG | 90% | 100–200 KB | Platforms re-compress; start higher |
| Email newsletters | JPEG | 80% | 40–80 KB | Compatibility over compression |
| Print preparation | TIFF/PNG | Lossless | N/A | Never use lossy for print |
Pro tip: When compressing images for social media platforms like Instagram, Facebook, or LinkedIn, start with a slightly higher quality setting (85 to 90 percent) because these platforms apply their own compression when you upload. Starting higher compensates for the double compression. For detailed platform-specific dimensions, see our guide on how to resize images for social media.
How to Verify Your Compression Results
Compressing images is only half the job - you need to verify that the results meet your quality standards and actually improve performance. Here is a systematic verification workflow.
Step 1: Visual Quality Check. Open the original and compressed images side by side at 100 percent zoom. Look for banding in gradients, blurriness in text, and blocking artifacts in areas of subtle color transition. If you can spot differences at normal viewing distance, increase the quality setting by 5 percent and re-compress.
Step 2: File Size Verification. Confirm that you achieved meaningful compression. For photographs, you should see at least 50 percent reduction. If the compressed file is only 10 to 20 percent smaller, you may be using lossless compression on a photograph (switch to lossy) or the image was already compressed.
Step 3: Page Speed Test. Run your page through Google PageSpeed Insights before and after replacing images. Focus on the LCP metric - it should improve noticeably. Google will also flag any remaining images that could benefit from further optimization.
Step 4: Core Web Vitals Monitoring. After deploying compressed images to your live site, monitor your Core Web Vitals in Google Search Console over the following 28 days. You should see LCP improvements reflected in the field data as real users experience the faster-loading pages.
Common Mistakes That Destroy Image Quality
Even experienced developers make compression mistakes that either waste bandwidth or produce visibly degraded images. Avoid these pitfalls.
Re-compressing already compressed images. Every round of lossy compression removes additional data. If you download a JPEG from a stock photo site and re-compress it, you are applying lossy compression on top of lossy compression. Always work from the highest-quality source file available.
Using the wrong format for the content type. Saving a logo or screenshot as JPEG introduces visible artifacts around sharp edges and text. Use PNG or SVG for graphics with hard edges, and reserve JPEG/WebP for photographs.
Ignoring dimensions. Uploading a 6000 by 4000 pixel image and relying on CSS to display it at 600 by 400 pixels means the browser downloads 10 times more data than necessary. Resize to the display dimensions before compressing.
Setting quality too low for e-commerce. Product images directly influence purchase decisions. Compressing product photos below 80 percent quality can introduce visible artifacts that make products look less appealing. For product photography, 85 percent is the minimum recommended quality.
Forgetting about retina displays. Modern screens display images at 2x or 3x density. An image displayed at 400 by 300 CSS pixels needs to be 800 by 600 actual pixels to look sharp on a retina display. Size your images at 2x the display dimensions, then compress.
Compression for E-Commerce: Special Considerations
E-commerce product images deserve extra attention because they directly impact conversion rates. Shoppers cannot physically touch or examine your products - your images are the entire shopping experience.
For marketplace sellers on platforms like Etsy, Amazon, or eBay, each platform has specific image requirements. Etsy, for example, requires a minimum of 2000 pixels on the longest side for zoom functionality, and recommends a 4:3 aspect ratio for listing thumbnails. See our complete guide to Etsy product photo requirements for platform-specific details.
The ideal e-commerce compression workflow is: shoot at the highest quality your camera supports, edit in a lossless format (TIFF or PNG), resize to your platform's recommended dimensions, then compress to WebP at 85 percent quality. This preserves product detail while keeping file sizes manageable.
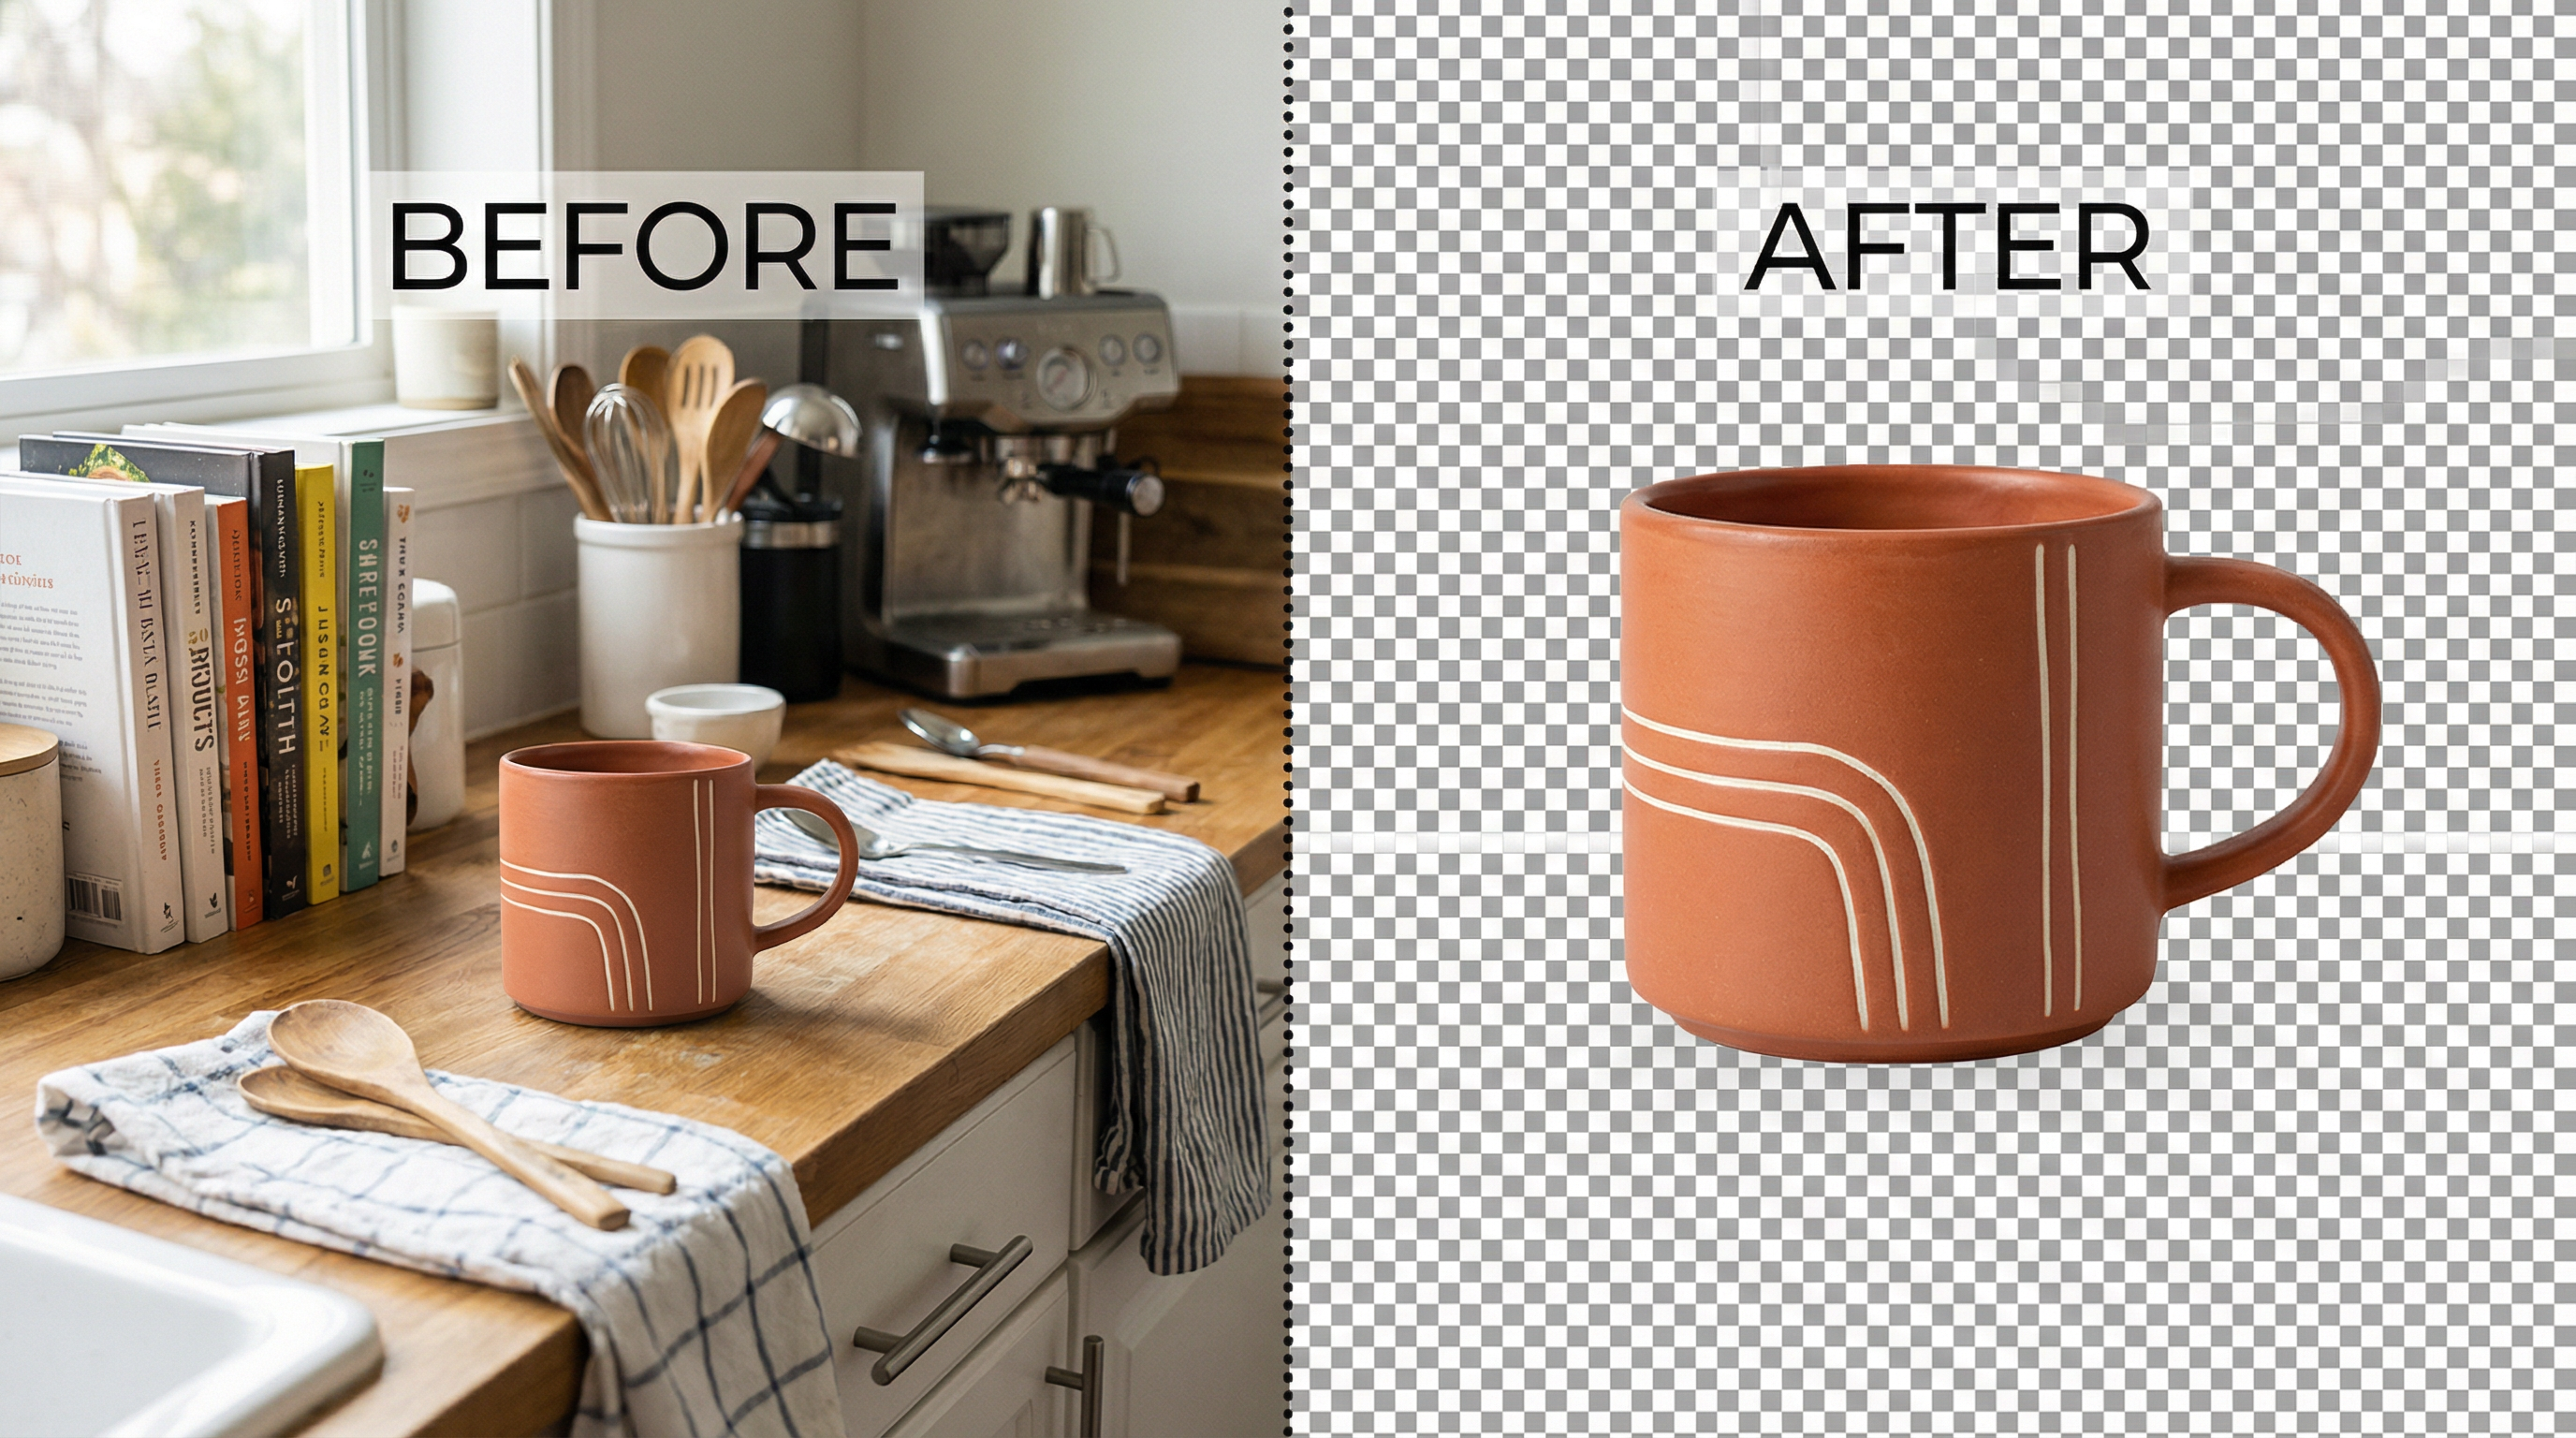
For product images that need transparent backgrounds - such as items displayed on a white or custom-colored background - use the SwiftCompress Background Remover to isolate the product, then export as WebP with transparency support. Learn more in our guide on how to remove image backgrounds for free.
Frequently Asked Questions
What is the best quality setting for compressing JPEG images?
For most web use cases, 80 to 85 percent quality provides the optimal balance between file size and visual quality. At this setting, lossy compression artifacts are virtually imperceptible to the human eye, while file sizes are typically reduced by 60 to 80 percent compared to the uncompressed original. For e-commerce product images where quality is critical, use 85 percent. For blog content images and thumbnails, 75 to 80 percent is sufficient.
Does converting JPEG to WebP reduce quality?
Converting JPEG to WebP at equivalent quality settings does not produce visible quality loss. WebP uses a more efficient compression algorithm that achieves 25 to 35 percent smaller file sizes at the same visual quality level. However, since both JPEG and WebP lossy compression are irreversible, always convert from the highest-quality source file rather than re-compressing an already compressed JPEG.
What is the difference between lossy and lossless compression?
Lossy compression permanently removes some image data to achieve dramatic file size reductions (60 to 90 percent). The removed data is chosen by algorithms that identify what the human eye is least likely to notice. Lossless compression reduces file size (20 to 40 percent) without removing any data - the original image can be perfectly reconstructed from the compressed file. Use lossy for photographs and lossless for logos, icons, and graphics with text.
How much can I compress an image before quality loss is visible?
The threshold varies by image content, but as a general rule, lossy compression at 75 percent quality or above produces no visible quality loss for photographs when viewed at normal screen distance. Images with large areas of solid color or subtle gradients are more sensitive to compression artifacts than images with complex textures and detail. Always preview your compressed images at 100 percent zoom to verify quality before publishing.
Is WebP better than JPEG for website images?
Yes, for the vast majority of web use cases. WebP delivers 25 to 35 percent smaller file sizes than JPEG at equivalent visual quality, supports both lossy and lossless compression, handles transparency (which JPEG cannot), and is supported by over 97 percent of browsers. The only scenario where JPEG is preferable is when you need guaranteed compatibility with very old browsers or email clients.
Does image compression affect SEO?
Image compression positively affects SEO in multiple ways. Smaller images load faster, which improves Core Web Vitals scores - particularly Largest Contentful Paint (LCP), which Google uses as a ranking signal. Faster pages also reduce bounce rates and increase time on site, both of which are positive user engagement signals. Google explicitly recommends optimizing images as part of its page experience guidelines.
How do I compress images in bulk without losing quality?
Use a browser-based batch compression tool like SwiftCompress that processes multiple images simultaneously. Upload all your images at once, set the quality level (85 percent recommended), and download the compressed batch as a ZIP file. For websites with hundreds of images, consider using a CMS plugin that automatically compresses images on upload, or a CDN with built-in image optimization like Cloudflare or imgix.
Should I use AVIF instead of WebP?
AVIF delivers approximately 50 percent smaller file sizes than JPEG (compared to WebP's 25 to 35 percent), making it the most efficient format available. However, browser support is currently around 92 percent - slightly lower than WebP's 97 percent. The best approach is to use the HTML <picture> element to serve AVIF to browsers that support it, with WebP as a fallback and JPEG as a universal safety net. This gives every visitor the smallest possible file their browser can handle.
Start Compressing Your Images Now
Every uncompressed image on your website is costing you visitors, conversions, and search rankings. The techniques in this guide - choosing the right format, setting optimal quality levels, resizing to display dimensions, and stripping unnecessary metadata - can reduce your total image bandwidth by 70 to 90 percent without any visible quality loss.
The fastest way to start is with SwiftCompress - drop your images in, adjust the quality slider, and download optimized files in seconds. Everything processes in your browser, so your images stay private and compression is instant.
For ongoing optimization, bookmark our guides on social media image sizing and e-commerce product photography to ensure every image you publish is optimized for its specific platform and purpose.